Fastlane for Enterprise
Learn how to use Fastlane in enterprise environment.
In case you were wondering, no - Fastlane doesn’t have an Enterprise offering. It always was and I hope will be an open-source product.
What the article really is about is how to use Fastlane in enterprise environment. Specifically those Fastlane actions that need connection to external URLs.
Enterprise Environment
If you are one of the lucky devs, who just “connect to Internet directly”™️, you may as well just skip this article and get back to enjoying Getting Things Done.
If, my unlucky friend, the words like company proxy and company firewall sound familiar, then you may find the rest of the article useful.
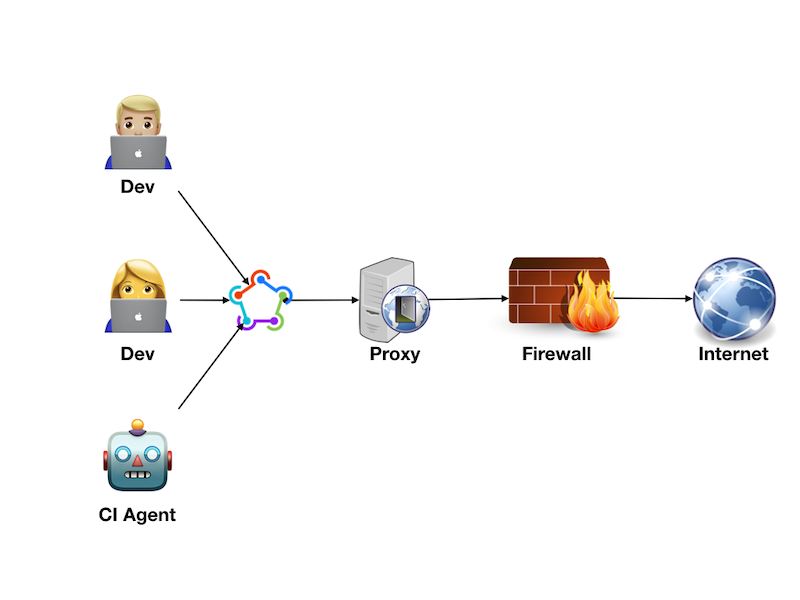
So, in very simple terms for non-DevOps engineers like me, working in a big enterprise company usually means that there’s at least one proxy server sitting between you, the developer, and outside world, aka The Internet. Proxy will make sure to authenticate you securely, just to know who you are; and it will do other important things, like peeking inside every single zip archive you download. Why? Because it can…
To make sure you don’t visit harmful websites like GitHub Gists (🤯), there’s also a network firewall thrown into the mix. The firewall will only allow connections to the whitelisted endpoints.
Whitelist
If you are the one tasked with a job of “Uploading ipa file to TestFlight from CI server”, the first thing to do is to request access to Apple endpoints via your company proxy and firewall. Mind you, the journey you are about to embark on will make Homer’s Odyssey look like a pleasant weekend trip. Depending on the complexity of your company’s IT infrastructure and level of support, you’d better collect all the information on your side first and check it twice, before submitting any requests.

Now, Spaceship is the core part of Fastlane that enables access both to Apple Developer Center and to App Store Connect. The list of API endpoints used by Spaceship is a good starting point for the request you are about to submit.
I’d even recommend to go one step further and request to whitelist access to all URLs on apple.com domain. It will make your setup more future proof, in case Apple adds new APIs or changes existing private APIs, which they do quite often.
The final list of domains to whitelist should be like this:
*.apple.com/*- for all kind of Apple stuff.*.devimages.apple.com.edgekey.net/* - this is not strictly required for communicating to dev portal or App Store Connect, but this is where Fastlane can download iOS Simulator images.*.mzstatic.com/*- so that Fastlane can download screenshots of your app from App Store Connect.
The port to request access for is 443 - for all HTTPS traffic.
🤖 Service Account
Before you go ahead with submitting new request for your IT infrastructure change, make sure you have a service account as well.
Unlike normal user accounts, service accounts are not tied to a particular employee. This is very important. When a person leaves a company, their account gets eventually wiped and CI pipelines get broken, so the lesson is: never use personal accounts for CI setup. Service accounts don’t ask for a pay rise, don’t chuck a sickie, and they just don’t quit.
Another good thing about service accounts, they normally don’t have the password expiry policy set. You don’t have to update your CI configuration with a new password every 90 days or so.
If you don’t have a service account, request one then. Yes, it may mean you have to open yet another request to some other DevOps team, but who said enterprise was easy?
Using Fastlane behind the Proxy
Fast-forward N weeks, where N is a random large non-negative number, and you have the following at your disposal:
- A service account username and password, and maybe even an email, if you are super lucky.
- Let’s assume the username is part of Active Directory Domain and comes in a
au\usernameform, whereauis the domain. -
Let’s also assume the password is just
password. - All requested domains are whitelisted on all levels of intranet.
- You service account can authenticate to the company proxy using username and password and access whitelisted domains.
- Let’s assume the proxy host name is
company-proxyand it listens on port8080for all incoming connections.
Curl Test
First off, run a simple curl test to make sure everything works:
The --proxy-user and --proxy options are self-explanatory, though note the backslash escaping as \\.
By saying --proxy-anyauth we tell curl to work with any authentication scheme that the proxy supports.
Most likely, all outgoing network traffic on your dev machine is signed with a company’s own self-signed Root Certificate Authority (CA) certificate, so we use --insecure option to convince curl to accept this self-signed certificate.
The self-signed root CA and authentication scheme will play very important role further on.
The output of the command should be something like this:
Unauthenticated
Request ID: ABCABCBACBACXYZXYZXYZZ37.0.0
Which is good. It means the request went all the way to appstoreconnect.apple.com.
🔏 Root CA and SSL Certificates
Just like with curl, self-signed root CA certificate will not be accepted by Fastlane either. While running Fastlane, you won’t have any option like the curl’s --insecure flag. Instead you need to add your internal root CA certificate to rubygems path, because Fastlane is a Ruby gem:
You may have to use sudo if you are using system Ruby version, though I’d recommend to use RVM or rbenv to manage your rubies.
If you are using RVM you need to run the following as well:
Now you can use this Ruby script to test SSL connection.
E.g. just run it directly like this:
💲 Environment Variables
Next thing you will notice is that Fastlane doesn’t have any option for passing proxy information.
Luckily, Fastlane is being a good citizen and respects all the /http[s]_proxy/i environment variables, namely:
HTTP_PROXYHTTPS_PROXYhttp_proxyhttps_proxy
Remember this “Gang of Four”, nothing else will cause you as much pain as this bunch!
Somewhere in your ~/.bash_profile or other appropriate shell profile, set these environment variables, for example:
Note that proxy URL is set in the following format:
http://
<domain>\<username>:<password>@host:port
Without username and password, you wouldn’t be able to authenticate with your proxy.
Now give it a try, run the simple download_screenshotsdeliver action:
Answer all the prompts and see if it worked. I bet it did not!
Long story short, Fastlane is using faraday HTTP client Ruby library, which uses Kernel.URI method, which can’t handle backslash \ in username.
The solution is to use percent-encoding for \, i.e. %5c:
You should be able to download screenshots now, though that’s just a first tiny step towards the final goal.
Well, actually, you can do a lot of things now, such as registering devices, managing App IDs and provisioning profiles, and more.
But I’d assume you also want to upload a new ipa to TestFlight, so meet The Transporter then…
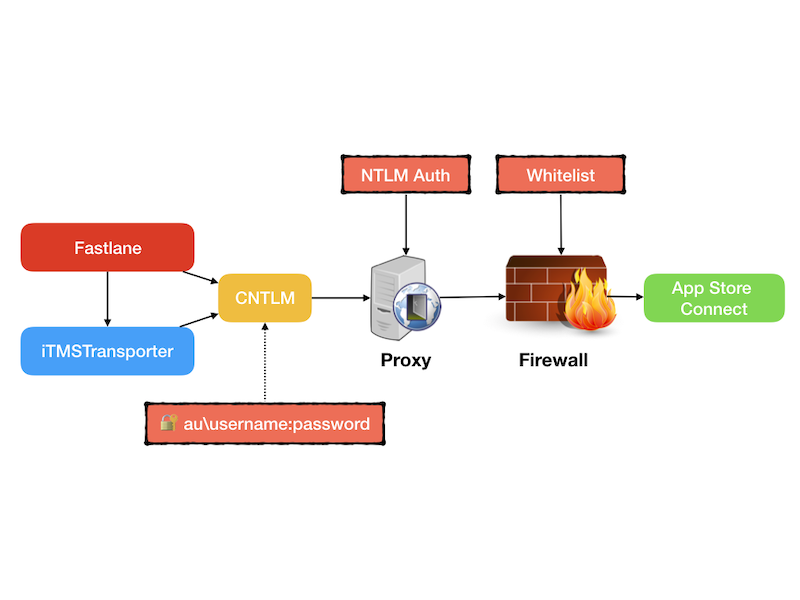
🚎 Transporter
Transporter aka iTMSTransporter is a Java-based command-line tool used to “upload things to App Store”, including app metadata and new ipa builds.
Installing Transporter
So how do you get a copy?
Well… according to Apple, you first login to your developer account and then click the download link like this one.
But wait! You can’t download it unless you have Admin or Technical role.
I mean, “Why, Apple?! Why?!” 😱
Transporter is available as part of Xcode installation anyways, why make things so hard?
Why not make it available at Apple Developers Downloads at the very least?
Anyways, if you choose to use copy bundled with Xcode, then you can find it at
/Applications/Xcode.app/Contents/Applications/Application Loader.app/Contents/itms
Just grab the whole directory.
If you installed it via Mac OS package, then get it at
/usr/local/itms
Patching Transporter
If you wonder: “Why do I need a copy of Transporter? Can’t Fastlane just use it as is?”
Good question, you don’t need a copy of Transporter, you can use the one available inside Xcode or in your /usr/local, but you would have to patch it before using anyways.
Given that Transporter is a Java-based command-line app, it has the same issue as curl or any Ruby gem would have with your company’s internal self-signed root CA certificate - it won’t trust it. Apple didn’t bother to add a command line or configuration option of any kind to Transporter to trust self-signed certificates.
Thankfully, Transporter isn’t just a Java-based app, it comes with it’s own version of Java runtime bundled up inside itms/java. Try running itms/java/bin/java -version to see more info.
Now, the itms/java folder also contains lib/security/cacerts file, which is a keystore with CA certificates. So you need to add your company certificate to cacerts and itms/java/bin/keytool is just the right tool to do that.
Here ${ROOT_CA_PATH} is path to the certificate file, which you can locate directly or find it in OS X keychain
Now you’ve convinced Transporter to trust your root CA, but you are not there yet, because you also need to teach Transporter some respect towards your new and shiny proxy, which is where the trouble awaits for you… again.
Transporter and Proxy
Well, now that we know that Transporter is a Java-based app, we look closer inside itms folder and find itms/java/lib/net.properties - a Java properties files used to configure JVM that Transporter runs in.
The group of proxy variables is exactly what we need:
You don’t even have to modify the net.properties file, Fastlane reads the value of special DELIVER_ITMSTRANSPORTER_ADDITIONAL_UPLOAD_PARAMETERS environment variable and uses it to configure Transporter, for example in your bash script add the following export statement:
But will it work? By now you’ve been there enough times to know the answer - “No”. 😜
Proxy configuration needs to include username and password for Basic authentication.
You can try to add au%5cusername:password@company-proxy as the host value, but it will not work.
Removing jdk.http.auth.tunneling.disabledSchemes=Basic limitation from net.properties won’t help either.
While trying to google you may find mention of these properties:
Those are part of Apache HTTP Client JVM options though and are not part of default Oracle’s network properties, also Transporter doesn’t respect them.
🚧 Feels like another roadblock.
Another Proxy
The solution this time is to create yet another proxy (as if there wasn’t enough problems with them already!).
This “man in the middle” local proxy will take care of passing authentication information to your company proxy. The credentials no longer have to be hard-coded in proxy URL. This way the command line tools like Transporter can use local proxy for network connections and local proxy doesn’t require any type of authentication.
There is a number of proxy tools available for Mac OS. In this example I’ll be using CNTLM.
I’ll briefly mention that I also tried TinyProxy and ProxyChains-NG. TinyProxy just wouldn’t let me use \ or %5c in configuration file, while with ProxyChains-NG I just eventually gave up after a number of failed attempts to make it work.
So, CNTLM, a fast proxy for NTLM authentication implemented in C.
Easy to install.
Easy to configure, just put the following in cntlm.conf:
Now run this command to generate password hashes:
Type in your account password, copy hashes and append them to cntlm.conf:
Then run it:
Finally, configure proxy environment variables:
Give it a go!
What do you mean by “It doesn’t work!”?. Something about proxy returning invalid challenge?
Well, that just means you company proxy doesn’t support NTLM authentication and only supports Basic authentication. That needs to be changed by requesting IT support again, I’m afraid.
Now the curl test should finally work and your configuration looks like this:
Upload ipa
You are all set now to run one of the most common and recurring tasks in Continuous Delivery process for an iOS app - upload a new build to TestFlight.
Start by setting up the basic lane using pilot action.
To skip the password prompt, set FASTLANE_PASSWORD environment variable. It could be a secret parameter in your CI server configuration or you could save it in OS X keychain as AppleID.Password and read like so:
It’s important not to confuse Apple ID used as username with Apple ID of the app. Latter is the unique identifier the app is assigned in App Store, that’s why it is often referred to as Adam or Adam/Apple/App ID. You can find out Adam ID of the app by navigating to it in App Store Connect and grabbing the last part of URL.
Then again, app_identifier parameter is actually the Bundle Identifier stored under CFBundleIdentifier in the application’s Info.plist.
In this example, we don’t want to submit new build for review yet and we don’t want to wait for processing either, thus both skip_submission and skip_waiting_for_build_processing are set to true.
Note, that with most of Fastlane actions, each action parameter is shadowed by an environment variable. For example, instead of setting ipa parameter you can set PILOT_IPA environment variable. To see full list of parameters for an action, run bundle exec fastlane action <action_name>, for example:
Try to run the lane now, after setting up all the environment variables, of course:
Fastlane Session
If you plan to use similar action on CI server, then Two-factor authentication (2FA) enforced by Apple will become an issue. To avoid 2FA on CI servers, you need to set the FASTLANE_SESSION environment variable as described here.
Whenever using 2FA the browser will prompt you if you want to trust this particular browser. Doing so will generate a long-living session token (30 days) which will then be picked by Fastlane’s spaceauth command. This way you will only have to update your CI server configuration once every 30 days. There may be some ways to keep the session token up to date by running scheduled CI jobs that perform Spaceship login, though I haven’t tested that approach yet.
Summary
By the end of this journey you are able to upload new iOS app builds to TestFlight from the enterprise network, e.g. from a CI build agent.
It’s amazing how such a basic task requires so much extra effort when dealing with all the overhead inherent to most large companies.
I hope it was worth the effort though. Once it all set up and runs smoothly, there are so many other apsects of iOS development that can be automated using tools like Fastlane.