Bamboo Remote Agent on Mac OS X
A short guide for installing and configuring Bamboo Remote Agent on Mac OS X.
The starting point for an agent is a server, you should either have it configured for you or install yourself.
Atlassian documentation is always a good place to start. Next important thing is to have Java installed on remote agent machine.
Configure Server
You start by configuring server. Open Bamboo server dashboard in the browser and navigate to Bamboo Administration page (via Settings button in top right). Surely you have to be admin to get there.
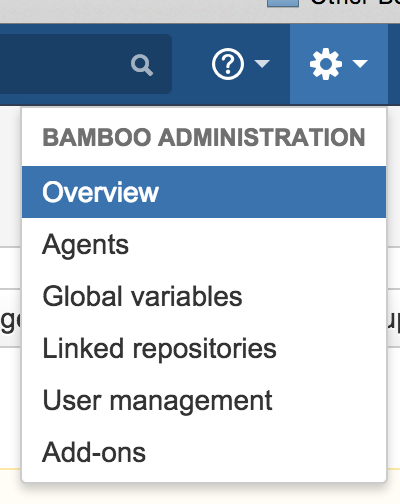
Now select Agents on the left and click “Enable remote agent support”.
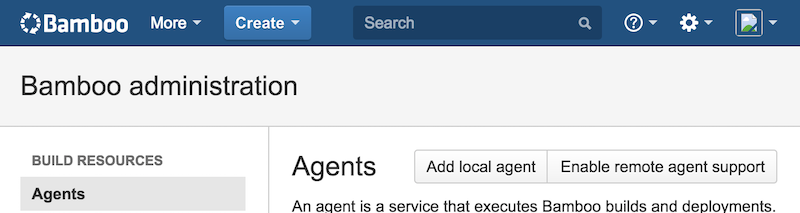
You can click “Install remote agent” now.

Install Agent
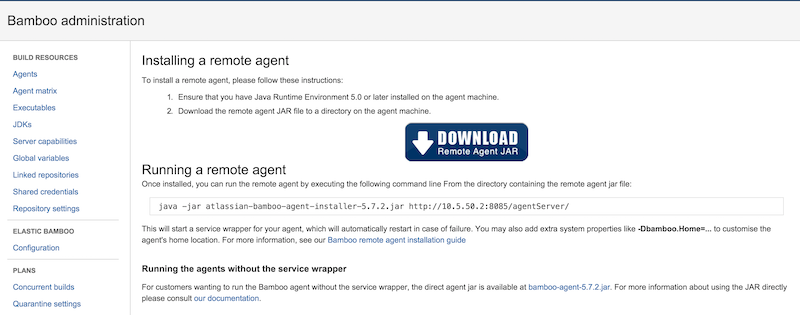
You are now looking at the page with further instructions. Just like Jenkins build agent Bamboo Remote Agent is a Java JAR file that needs to be downloaded to a target agent machine and then ran there.
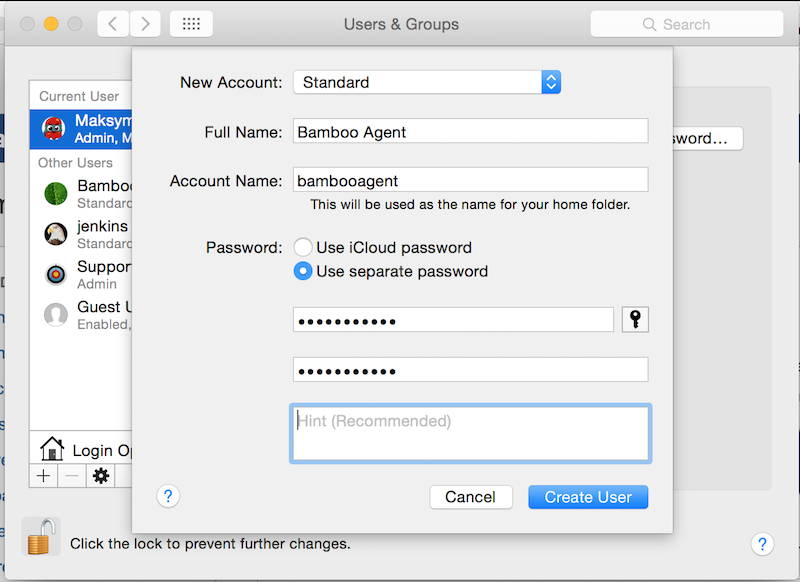
Before you proceed you need to configure remote agent machine. Just like Bamboo server works well with a special user, remote agent will benefit from running under a designated user account. Create a Standard account from System Preferences, in this example we will name it bambooagent so this user’s home will be /Users/bambooagent. To make the whole process easier from now on I am assuming that you are currently logged in as bamboo-agent user.
Just like Jenkins remote agent, Bamboo remote agent needs an installation and home directories. So let’s create these two.
cd /Users/bambooagent
# Create installation directory.
mkdir bamboo-agent
# Create home directory.
mkdir bamboo-agent-home
Installation directory is where you need to put agent JAR file and then this JAR will download other required files and keep them in installation directory. Updates will occur in this directory as well.
Home directory is the location for all the build jobs metadata, intermediate build files, artifacts and so on.
Now it’s time to install, first get the JAR and put it into installation directory.
cd /Users/bambooagent/bamboo-agent
wget http://your-server-host:8085/agentServer/agentInstaller/atlassian-bamboo-agent-installer-5.7.2.jar
Or simply manually download it and put in the directory.
It is time to run the JAR and let Bamboo complete installation process.
java -Dbamboo.home=/Users/bambooagent/bamboo-agent-home \
  -jar atlassian-bamboo-agent-installer-5.7.2.jar http://your-server-host:8085/agentServer/
bamboo-agent-home is the default name for Bamboo home directory, but it doesn’t hurt to be more explicit and specify it.
If you have to take proxy into account, add more -D options, for example
-Dhttp.proxyHost=mycompany.proxy.host
-Dhttp.proxyPort=8080
-Dbamboo.agent.ignoreServerCertName=true
The last one is useful when dealing with self-signed certificates.
Fix the Broker URLs
As usual, nothing just works right away, as if it was designed that way…
For example, if you just experiment on your development machine where Bamboo server is already up and you want to run agent on the very same hardware, you would naturally use localhost as host name.
# Example for localhost.
java -jar atlassian-bamboo-agent-installer-5.7.2.jar http://localhost:8085/agentServer/

# Output log.
INFO   | jvm 1    | 2015/02/19 08:51:49 | 2015-02-19 08:51:49,438 WARN [Thread-0] [BambooActiveMQConnectionFactory] Broker URI: tcp://10.5.50.2:54663?wireFormat.maxInactivityDuration=300000 is invalid: java.net.ConnectException: Network is unreachable
OK, so it doesn’t work. Bamboo agent tries to hit so called Broker URI, which is pointing to the server, in this example it’s “tcp://10.5.50.2:54663?wireFormat.maxInactivityDuration=300000”.
Note the highlighted parts. First the fact that Broker URI uses an IP address (10.5.50.2 in this example). Second and more important is the port number in Broker URI (54663). Basically this means “say hello to Firewall!” and I’ll get back to that later.
If you change localhost to 127.0.0.1 the results will be the same, that’s because Broker URI is part of Bamboo server configuration and has to be set manually.
This is where I have to add a note that I’m trying this on the train with no internet connection, so basically my laptop is offline. I also have
HTTP_PROXYenvironment variable set, so no wonder agent can’t resolve Broker URI with an IP address (even after I unsetHTTP_PROXYvariable).
Anyway, let’s figure out what is that Broker URI and where it can be changed. For that open Bamboo server dashboard, navigate to Administration page and find “General configuration” menu on the left in “SYSTEM” category.
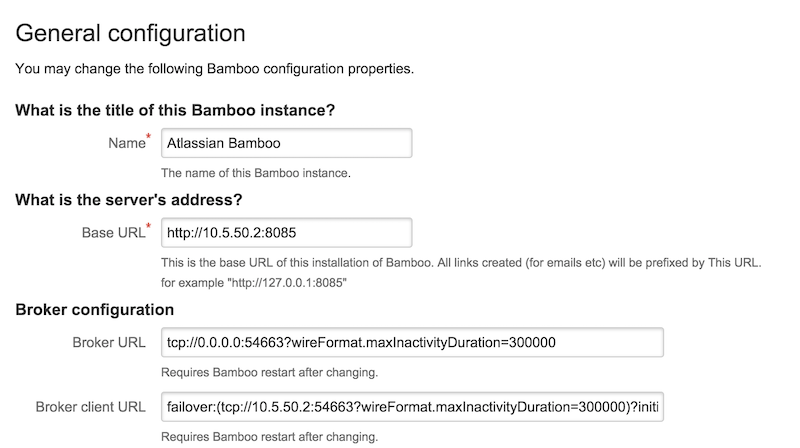
Here it is, the question remains how to set it correctly. Here are the rules I learned the hard way.
Local Server
This is the case when both the server and agent are on the same local area network. Have a look at this discussion and this one too.
Ultimately in LAN configuration you have to use your server’s hostname with .local suffix. To get the hostname run hostname on the server machine.
hostname

# Example output.
R5003398.local
Remote Server
In this setup your server is remote from the agent’s point of view. For example your company uses Bamboo OnDemand and hosts server and elastic agents in EC2 cloud. But Mac agent is not an option for the cloud, so you end up hosting it in-house, meaning it’s sitting behind company firewall.
Another thing learned the hard way is to configure Broker client URL using IP address and not the host name. Don’t ask me why, I don’t have an exact answer. Probably this is specific for Mac agents. Most likely I missed something important, but here I give you the solution that works. This means the Bamboo server IP address needs to be static, which isn’t usually a problem and is preferred configuration anyway.
Apply Changes
You can change Broker URI using Bamboo UI, but you can also configure it with text editor. Bamboo server keeps it’s configuration in home folder (/Users/bamboo/bamboo-home if you followed this guide). This is how properties look like.
<property name="bamboo.artifacts.directory">${bambooHome}/artifacts</property>
<property name="bamboo.config.directory">${bambooHome}/xml-data/configuration</property>
<property name="bamboo.jms.broker.client.uri">failover:(tcp://R5003398.local:54663?wireFormat.maxInactivityDuration=300000)?initialReconnectDelay=15000&maxReconnectAttempts=10</property>
<property name="bamboo.jms.broker.uri">tcp://0.0.0.0:54663?wireFormat.maxInactivityDuration=300000</property>
If you are making changes via UI you will see a message saying that you need to restart all remote agents. Guess what, that’s not true. You can give it a go and restart an agent and observe no changes in failover URI. The truth is that you have to restart the server for changes to take effect.
Try It Out
So in my example I change the Broker client URL to use local hostname.
failover:(tcp://R5003398.local:54663?wireFormat.maxInactivityDuration=300000)?initialReconnectDelay=15000&maxReconnectAttempts=10
Now I start an agent and this time it works.
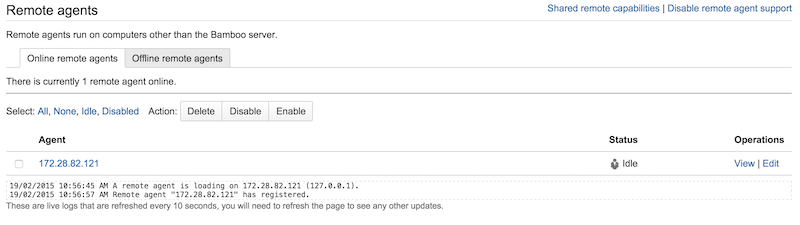
INFO   | jvm 1    | 2015/02/19 10:56:57 | 2015-02-19 10:56:57,794 INFO [Thread-0] [RemoteAgent] * Bamboo agent '172.28.82.121' ready to receive builds.
INFO   | jvm 1    | 2015/02/19 10:56:57 | 2015-02-19 10:56:57,794 INFO [Thread-0] [RemoteAgent] * Remote Agent Home: /Users/bambooagent/bamboo-agent-home
INFO   | jvm 1    | 2015/02/19 10:56:57 | 2015-02-19 10:56:57,794 INFO [Thread-0] [RemoteAgent] * Broker URL: failover:(tcp://R5003398.local:54663?wireFormat.maxInactivityDuration=300000)?initialReconnectDelay=15000&maxReconnectAttempts=10
If I navigate to Bamboo server Agents page, I can see remote agent being online and ready to pick up builds.
Launch Agent
Next step is to make sure that remote agent starts automatically in case Mac box restarts. Start by enabling autologin for babmooagent user, this way system will login into the user’s account and fire up all of its launch agents.
To make the best use of Bamboo remote agent, it should be started as a launch agent, see Launch Daemon vs Agent for more details.
Create com.atlassian.bamboo-agent.plist in /Users/bambooagent/Library/LaunchAgents. This is an example file.
<?xml version="1.0" encoding="UTF-8"?>
<!DOCTYPE plist PUBLIC "-//Apple Computer//DTD PLIST 1.0//EN" "http://www.apple.com/DTDs/PropertyList-1.0.dtd">
<plist version="1.0">
  <dict>
   <key>Label</key>
   <string>com.atlassian.bamboo-agent</string>
   <key>ProgramArguments</key>
   <array>
   <string>/Users/bambooagent/bamboo-agent-home/bin/bamboo-agent.sh</string>
   <string>console</string>
   </array>
   <key>RunAtLoad</key>
   <true/>
   <key>ServiceDescription</key>
   <string>Atlassian Bamboo Mac OS X Build Agent</string>
   <key>StandardErrorPath</key>
   <string>/Users/bambooagent/bamboo-agent-home/logs/bamboo-agent.err</string>
   <!--
   <key>StandardOutPath</key>
   <string>/Users/bambooagent/bamboo-agent-home/logs/bamboo-agent.out</string>
   -->
   <key>KeepAlive</key>
   <true/>
   <key>UserName</key>
   <string>bambooagent</string>
</dict>
</plist>
As you can see it’s all standard stuff. Specify a label (Label), run agent at load (RunAtLoad), keep it alive and run the session as bambooagent user. There’s a detailed description provided and error output redirected into a file. You can see that I’m reluctant to save standard output to a file, that’s because the size of this file can become really big over time. Note that this is standard error and output for the agent runner, it may not necessary contain actual agent logs.
Finally, to start the agent a bamboo-agent.sh runner script is used from Bamboo agent home directory.
A usual practice is to have type aliases in your favorite shell to start and stop the agent from command line if needed. In this example I’m using launch agent label to control it. The same can be done by using launchctl [load|unload] plist-file.
alias start-bamboo-agent="launchctl start com.atlassian.bamboo-agent"
alias stop-bamboo-agent="launchctl stop com.atlassian.bamboo-agent"
alias restart-bamboo-agent="stop-bamboo-agent & start-bamboo-agent"
You may have noticed that there are no arguments for proxy, Java home and other settings. That’s because all these settings can be set in /Users/bambooagent/bamboo-agent-home/conf/wrapper.conf.
# The Bamboo Agent home configuration file
wrapper.java.additional.1=-Dbamboo.home=/Users/bambooagent/bamboo-agent-home
wrapper.java.additional.2=-Dbamboo.agent.ignoreServerCertName=false
#wrapper.java.additional.3=-agentlib:yjpagent

# Application parameters.  Add parameters as needed starting from 1
wrapper.app.parameter.1=com.atlassian.bamboo.agent.bootstrap.AgentBootstrap
wrapper.app.parameter.2=http://localhost:8085/agentServer/
In this example you can see how Bamboo agent home directory is set, as well as other settings including server URL (in this case it runs on localhost). To add proxy put more additional Java arguments
# The Bamboo Agent home configuration file
wrapper.java.additional.1=-Dbamboo.home=/Users/bambooagent/bamboo-agent-home
wrapper.java.additional.2=-Dbamboo.agent.ignoreServerCertName=false
wrapper.java.additional.3=-Dhttp.proxyHost=mycompany.proxy.com.au
wrapper.java.additional.4=-Dhttp.proxyPort=8080
# and so on...
Using wrapper.conf is preferred over jamming these arguments in launch agent plist.
Firewall
If you agent sits in corporate network and server is in the outer world (e.g. EC2 cloud), you will face some nasty firewall issues. Have a look at official Atlassian documentation. Ports number 8085 and 54663 (unless you specified different numbers) are used for bi-directional communication between agent and the server. Best practice is to open these ports in both directions. While lower port numbers are usually open, ports like 54663 need an exclusion rules configured in your company firewall. From experience this task can be either hard or impossible. Did you ever have that feeling that Network team is an extra layer or red tape and are there not to help you but to do the opposite? Welcome to the club then :).
To answer your question why Mac agent cannot be in the Cloud as well, see bits of my rant in Bamboo vs Jenkins and this discussion.
Summary
From this moment on you need to configure your remote agent’s Mac to be able to run Xcode builds and tests, as well as other CI tasks.
This is one of the ways to configure and run Bamboo remote agent.
If you are into Docker, check out this link. I’m only planning to give a try to this apparently awesome tool.