Swift Refactoring - Tests
Using TDD approach to implement Swift Local Refactoring action.
TDD or Test-driven development is a perfect approach when you face a new and unfamiliar code base.
It surely helped me, I was able to wind up a large number of tests and then iterate on actual implementation to make those tests pass.
However, learning how to write tests for Swift source code is a challenge by itself.
The project is using lit or LLVM Integrated Tester and you can find more details in Apple’s own Testing Swift documentation.
Test Refactoring Kind
I’ll be making changes to the swift-refactor tool in Swift toolchain.
For now I will treat that tool as a black box, i.e. I have no idea how the refactoring action is implemented.
What I do know though, is that if I give swift-refactor tool a file and specify a cursor position in that file, then it will print out a list of applicable refactoring actions at that cursor position.
So I’ll start by creating a new test file at swift/test/refactoring/RefactoringKind/collapse_nested_if_statement.swift with the following content:
Now, if I point a cursor at row 4 and column 4 in this file, I expect my new refactoring action to be applicable.
If I name the refactoring action “Collapse Nested If Statement”, then this text should be the output of the following command:
So my test case is this:
Given that I run swift-refactor for collapse_nested_if_statement.swift file, row 4 and column 4,
I expect the output to contain "Collapse Nested If Statement" string.
All I have to do now is write this test case using lit command.
This is how it looks:
This code is put directly into collapse_nested_if_statement.swift file and lit will pick it up from there.
Here’s the detailed breakdown of the test spec:
The CHECK-COLLAPSE-NESTED-IF-STATEMENT is also defined in collapse_nested_if_statement.swift like so:
So the refactoring action first begins (Action begins), then the Collapse Nested If Statement output is written to standard output and then the action ends (Action ends).
The special -NEXT syntax is how you can define multi-line strings.
More examples of refactoring kind tests.
Cursor Position Reference
You have probably spotted a small problem with -pos=4:4 argument of the test command.
If the tests are modified, refactored or moved around, then the actual cursor position of the start of test code can change.
When there’s dozens of tests in the single file, fixing up all the impacted -pos= arguments can be quite a challenge.
That’s where using cursor position reference is really helpful.
All you have to do is add a block comment like so
Now you can use "2-statements" string as a reference to the cursor position:
If the test2Statements is relocated in file or some changes happen to formatting or indentation, the tests will still point to the correct cursor position and will require no changes.
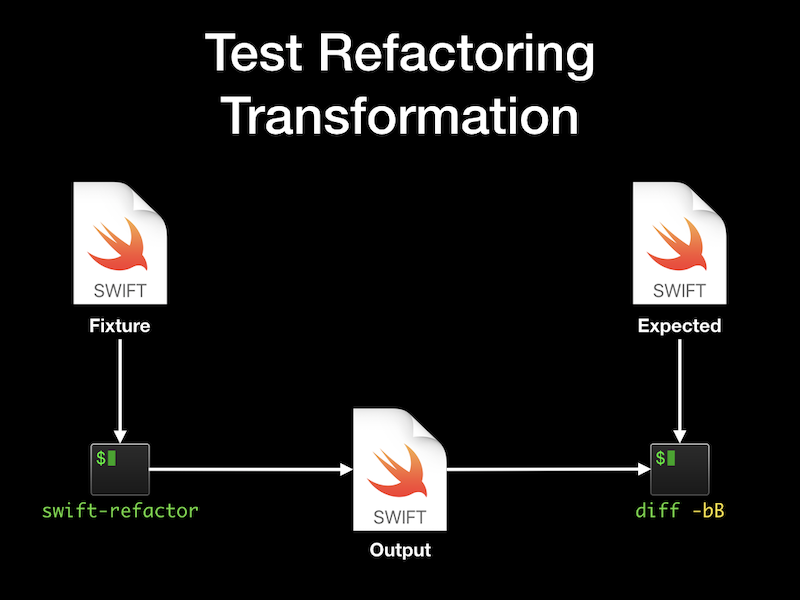
Test Refactoring Transformation
Next thing to test is the refactoring transformation itself.
The structure of these tests is like this:
- Take the test fixture Swift file that contains code to refactor.
- Pass it to
swift-refactorand capture the output. - Compare output to expected code using
diffutility.
I have created a new CollapseNestedIfStatement folder under swift/test/refactoring, then created basic.swift file and Outputs/basic directory.
basic.swift is where the lit tests will live and Outputs/basic is where expected outputs will be created.
Similar to refactoring kind test, I write the following Swift code in basic.swift:
After the refactoring action has been applied, I expect the code to look like this:
so this is what I put into Outputs/basic/2-statements.swift.expected.
Now I have to write lit test spec in basic.swift:
The test begins by cleaning up output directory with rm -rf %t.result && mkdir -p %t.result command. %t in this case is expanded to the test name.
Next the test runs %refactor command which expands to swift-refactor. The command is almost identical to the one in refactoring kind tests, except that this time I pass -collapse-nested-if-statement to tell swift-refactor to apply this particular refactoring action.
The
-collapse-nested-if-statementcommand line option hasn’t been implemented yet, but remember that this is TDD.
The output of swift-refactor is saved to %t.result/2-statements.swift.
Finally, the output is compared to expected Swift code using diff utility.
-u is used to compare 3 lines of unified context, while -B is used to ignore blank lines.
%S is expanded to the parent directory of the current (basic.swift) file.
That’s the basic approach, next step is to add more test code and expected outputs. Here’s an example.
Running Tests
Once you have enough tests and made your first changes to implement the new refactoring action, you can rebuild only the swift-refactor tool:
where SWIFT_BUILD_DIR is set to location of Swift build folder, for example build/Ninja-RelWithDebInfoAssert+swift-DebugAssert/swift-macosx-x86_64/.
To speed up the development process even further, you can use --filter option of lit.py to run selected tests only.
For example, to run only refactoring kind tests from collapse_nested_if_statement.swift:
Or to run refactoring transformation tests from CollapseNestedIfStatement/basic.swift:
Now you are all set for the usual “Build, Test, Repeat” development cycle.