Swift Refactoring - Implementation - Part 1
Implementing Swift Local Refactoring action.
Part 1 of 2.
Add Refactoring Kind
The chosen “Collapse Nested If Statement” refactoring is a cursor-based refactoring, so the first thing to do is to add this code to RefactoringKinds.def:
This macro will generate bare bones for new RefactoringActionCollapseNestedIfStatement class.
A new -collapse-nested-if-statement command line option needs to be added to swift-refactor tool in swift-refactor.cpp:
Now, to finish off the refactoring action implementation, the following two methods have to be implemented in Refactoring.cpp.
Both methods require current cursor info for implementation.
While isApplication takes it as a CursorInfo input argument, for performChange current cursor info is available as a member of auto-generated RefactoringActionCollapseNestedIfStatement class.
Is Applicable
The way I approached this implementation task is asking myself a question first.
When is “Collapse Nested If Statements” refactoring action applicable?
The obvious answer is:
When there are more then 1 nested if statements.
So the approach is to find nested if statements at current position and count them.
Let’s first define a simple structure that will hold information about nested if statements:
It’s very straightforward, we keep track of the first if statement (FirstIfStmt) and last then statement (LastThenStmt).
One important thing about collapsible nested if statements is that they all share a single then statement, they wouldn’t be collapsible otherwise.
We also save all the if statement conditions into Conditions list.
To decide whether a refactoring action is applicable, we need to have non-null first if and last then statements and more than 1 condition in the list:
With this new structure in mind, we can define a new helper method that finds all nested if statements under the cursor and then use it to implement isApplicable:
Find Nested If Statements
This is the part where we finally get down to using cursor info provided to us by refactoring engine.
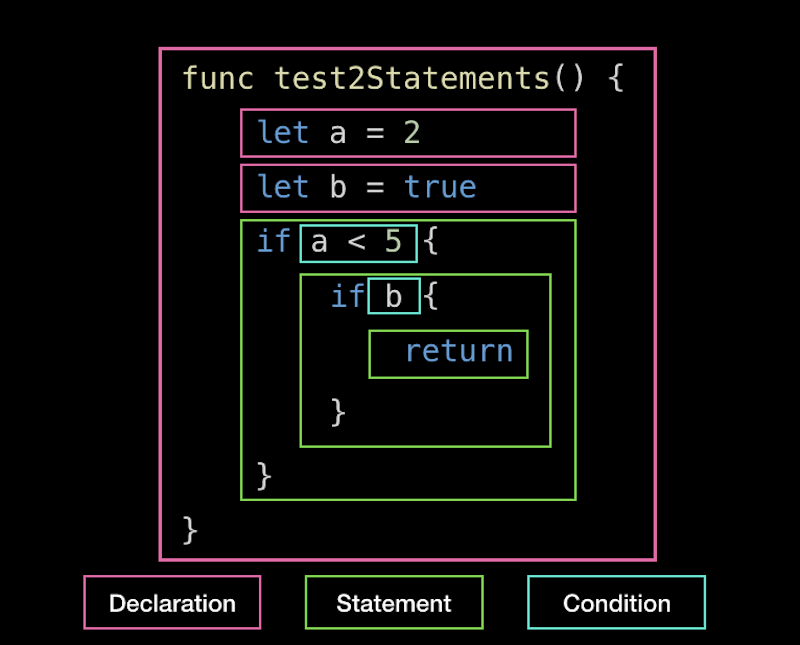
It’s easier to reason about the code in terms of declarations, statements and conditions. For example, for a code like this:
The high level view could be this:
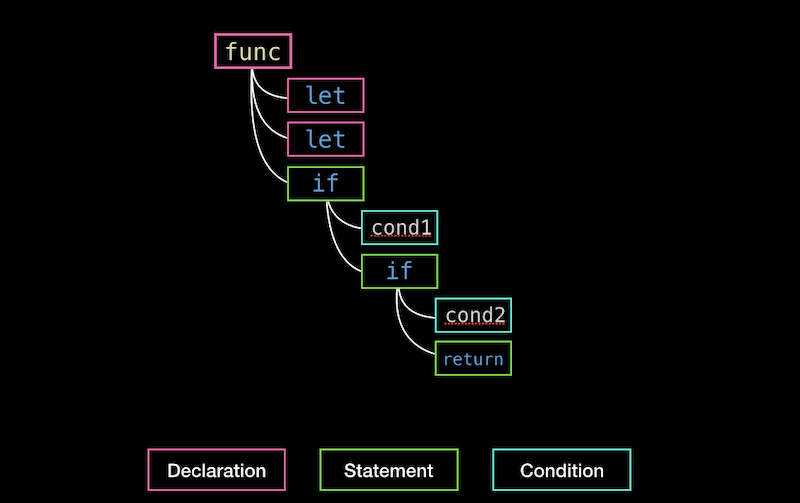
The (very rough) Abstract Syntax Tree sketch for this code:
If the cursor is pointing at the start of the first if statement, then the AST we need to analyze looks like this:
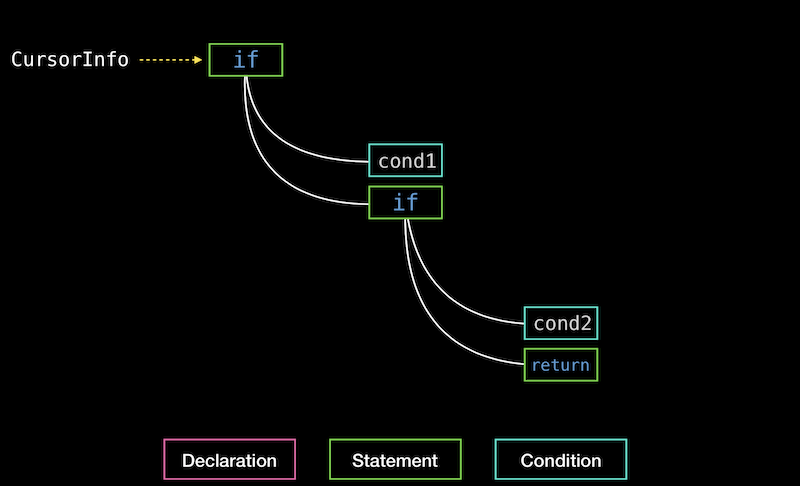
So the very first thing to check is to make sure cursor info is pointing at the start of the statement (StmtStart), the refactoring can’t be applied otherwise:
The returned empty NestedIfStatementsInfo() indicates that refactoring cannot be applied because NestedIfStatementsInfo().canProceed() is false.
Walk the Tree
Next thing to do is to start walking Abstract Syntax Tree.
// 1
For that we create a new type called NestedIfStatementsFinder, which inherits from SourceEntityWalker - the base class for walking the source code tree.
// 2
We also initialize an instance of NestedIfStatementsFinder called Walker.
// 3
Additionally, our walker should collect nested if statements info into the Result property.
// 4 and // 5
Finally tell walker to walk the AST starting from CursorInfo.TrailingStmt and return the result.
Next let’s have a look at some of the SourceEntityWalker interface.
It has a handful of methods to walk the AST, specifically it can walk the statement, declaration or expression.
For our implementation we have used bool walk(Stmt *S).
The type also offers customization points:
These methods can be overridden in types inheriting from SourceEntityWalker.
When true is returned, the walker will keep walking the tree, otherwise it will stop.
For out implementation, we choose to override walkToStmtPre, which is called when walker is about to walk the statement.
Let’s walk this code step by step:
// 1
We are only interested in nested if statements, so when statement kind (S->getKind()) is not StmtKind::If then there’s no point to continue (return false).
// 2
Now that we checked the statement kind, we can safely typecast it to IfStmt.
// 3
We want to keep track of the first if statement in the Result variable, so save it if this is the first if statement we encounter.
// 4
If current if statement has an else statement, it cannot be collapsed, so there’s no point to keep going.
// 5
We also need to keep track of last then statement, which will be useful while applying refactoring transformation.
// 6
If the then statement of current if statement has more than one elements, then the refactoring cannot be applied from this point on and need to stop.
Here’s an example of Swift code:
The if a < 2 if statement has 2 elements in the then statement: print(a) and if b > 1 statements.
// 7
Keep track of the if statement conditions in Conditions list:
// 8
Finally, recursively walk the first statement inside the then-block.
Test
Now it’s a good time to run the tests created in previous article to make sure implementation of isApplicable works as expected.